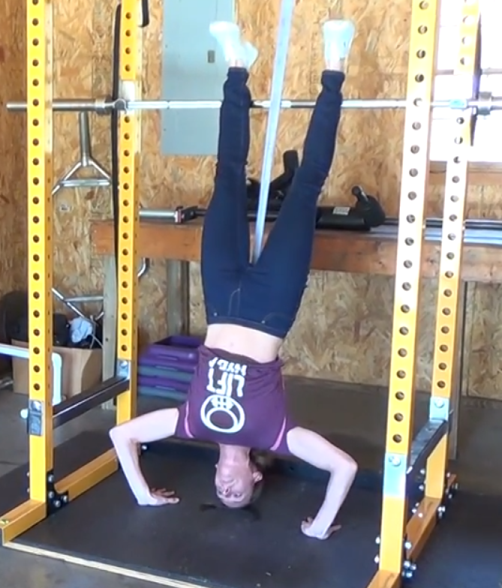
 Handstand push-ups are a great bodyweight exercise not only for your shoulders, but for building upper body pressing strength.
Most people can’t kick into a handstand and bust out a flawless handstand push-up from day one. This exercise usually requires slow and steady progression, but once you can do one, it’s definitely a great accomplishment.
You’ve seen handstand push-up progressions on Lift Like a Girl before, but today you’re going to learn a unique way to perform assisted handstand push-ups.
Before you watch the demonstration video I will note that you should not attempt this exercise unless you can hold a handstand (feet resting again a wall or other object is fine) for at least one minute. You need to be comfortable being in the handstand position and have the strength to hold your bodyweight for one minute or more, otherwise you may attempt this exercise and smash your face on the ground. Don’t do that.
If you can’t yet hold a handstand, use the progressions in this article to progress to that point; then you can attempt the assisted version below once you reach that milestone.
How to Perform Assisted Handstand Push-ups
First, you’ll need to have two resistance bands. The thicker the bands, the more assistance you’ll have. The thickness of the bands you use depends on your current strength levels and what rep range you’re training. For example, if your goal is to build maximum strength you’ll stay in the 1-6 rep range. If you want to build muscle you may train in the 8-20 rep range. Be sure to use an appropriate thickness for your current strength and training goals.
You’ll also need a power rack (or something similar) to loop the band around. Be sure to set a barbell securely in the power rack at about shoulder height; this is where your legs will rest and slide up and down during the exercise.
Now that you know what you need, watch the demonstration video:
Assisted Handstand Push-up Notes
- It’s a great idea to use the thickest bands possible when first attempting this exercise. Better to have too much assistance than not enough!
- After you’re comfortably in the top handstand position, lower slowly under control until your head lightly touches the ground, then press back up.
- Keep your body in a straight line – keep your stomach and butt tight the entire time.
- Make it harder! Using small resistance bands is definitely a way to make this harder, and gradually using less assistance is the ideal way to progress to performing unassisted handstand push-ups. Another option is to increase the range of motion by elevating your hands: put each hand on a weight plate or other sturdy object that will not slide away from you. Start by increasing the range of motion by one inch, then progress from there.
- Use thinner bands for lower rep sets and thicker bands for more assistance if you want to train in higher rep ranges.
If you’re goal is to progress to unassisted handstand push-ups you should use lower rep sets. Here’s a training guide I’ve used with clients to help them perform unassisted handstand push-ups:
- Weeks 1-4: 4×6 (4 sets, 6 reps)
- Weeks 5-8: 6×3 (6 sets, 3 reps)
- Weeks 9-12: work on doubles (sets of 2 reps) and singles (one rep)
The goal is to gradually use smaller resistance bands as you get stronger. The bands I’m using in the video is a set by Rubberbanditz. (Please note: that’s an affiliate link).
Related article: How to Perform Assisted Pull-ups and Dips
Like what you read (and watched)? Then join the Lift Like a Girl newsletter to get updates for all the newest articles on Lift Like a Girl. You’ll also get insider-only information AND a free gift. Sign up below.